Finished Photographs


CONCEPT


The concept of my photographs is too prove that the rules of composition can be found anywhere even in the smallest of photographs. The whole purpose of this project is to inspire photographers to never miss the opportunity’s for a good photograph, they can be found anywhere even in your back garden, which is where mine are based. This portfolio of work consists of 15 of the best photographs, that I have chosen out of 223 other photographs.

My photographs start from my gate, and finish in my house looking through the back window, and in each one of these photographs I have tried to capture the Rules Of Composition. Its as though your walking into my house from the back, but instead of just walking passed everything you zoom into each individual aspect of the garden, to show the detail and the beauty that most of the time people would just walk straight passed and not take any notice of. After I took my photographs I put them into photo shop and edited a few aspects, to bring the most out of my photographs.


Photograph 1: “Welcome”


1introframe


Rules Of Composition Used:

– Framing

The idea behind this photograph was to welcome the viewer into my idea. My gate had the perfect frame, to capsulated the full base of my photographs in one picture. When editing this picture I increased the Vibrance and the Saturation of the colours, it creates the affect that the viewer has looked through the hole in my gate and discovered this amazing colourful garden. For me it was an exciting way to begin my photographs. To sum it up, its as though your walking into my subject.


Photograph 2: “The Garden”


2thegarden


Rules Of Composition Used:

– Rule Of Thirds

– View Point

This Photo shows the base of my photographs in a whole. I had the rule of thirds in mind when taking this photograph, aligning the line on the right with the fountain, and the line on the left with the gate. The rule of thirds make for a more interesting and dynamique photograph, I used a tripod when taking this photograph to make sure the camera was straight when taking the photo, I lowered the tripod also to get a lower perspective as though your low down, it just adds a nicer affect onto the photograph.


Photograph 3: “Getting In A Little Closer”


3theleaf


Rules Of Composition Used:

– Cropping

– View Point

This is the first example of macro photography, And where the idea behind my photographs really begins, getting into the detail that people miss when walking passed. Getting down to a good view point, and keeping your camera steady you can take a beautiful photograph like this, you can really focus in on the detail. I took this photo with my camera set to macro, with an aperture setting of f/2.0 this allowed me to get a much sharper shot, and focus in on the detail of the leaf, also reducing the depth of field on the photograph, blurring out the background.


Photograph 4: “Water Drip”


4waterdroplet


Rules Of Composition Used:

– Cropping

– View Point

– Golden Triangle

In this photograph, I capture some water dripping off of a leaf using Macro photography. Because I couldn’t capture any photographs of insects, I wanted to add some form of life to the subject so I used a watering can on the plant to capture the water. My camera was set to a wide aperture of f/2.0 to lower the depth of field, and focus in on the subject. I used a lower view point than the last photograph also. I attempted to use the Golden Triangle on this photograph, as you can see the leaf is captured in the top right triangle, I aligned the central line along the background.


Photograph 5: “Peppers”


5pepperhanging


Rules Of Composition Used:

– Cropping

– View Point

In this photograph I used a slow shutter speed to capture the reflection of the light on the pepper’s, just below this subject their is a pool of water the light on the pepper’s where flickering due to the reflection of light from the water, so I used a slower shutter speed of 1/60 of a second, to increase the reflection of light on the pepper. I raised the view point for this photograph, and then set the aperture to f/2.0 to focus in on the subject, and lower the depth of field on the photograph.

After taking this photo I increased the vibrancy and saturation to bring out the orange colouring of the subject.


Photograph 6: “Floating”


6pepperinfountain


Rules Of Composition Used:

– Framing

– Symmetry?

– Background

This is probably one of my favourite pictures out of the bunch. When taking this photograph, I had framing in mind, inspired by one of the first photograph examples of framing I have seen. For some reason I see something quite symmetrical about this photograph, at the back down between the two concrete barriers theirs a symetrical element, but then its broken up by the vibrant orange pepper located in the middle. The surroundings of the pepper have been cancelled out, which in this case is the water the pepper just stands right out from the water.


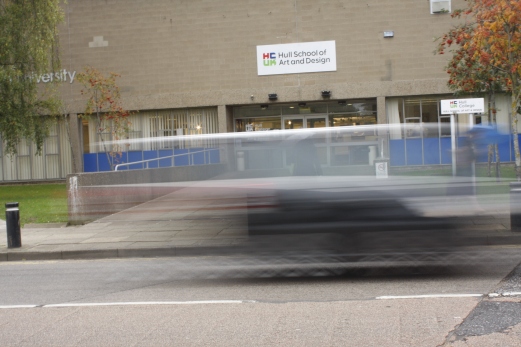
Photograph 7: “Sky Scraper”


7castroilplant


Rules Of Composition:

– View Point

– Background

– Leading Lines

This is my favourite photograph taken from the bunch. To me this photograph really does represent exactly what I was looking for in my first concept. I love the way from the view point I have taken it from, it looks larger than it actually is, like it would tower over the top of us. The blue sky background, really allows the viewer’s eyes to focus onto this sky scraper plant, and then follow the leading lines down the branches to the exploding ends, which almost look like fire works. When taking this photograph I had Stephen Studd’s work in mind.


Photogragh 8: “Sky Scraper Against The City”


8castroilplant


Rules Of Composition Used:

– Depth Of Field

– Background

– View Point

When taking this photograph I had depth of field in mind, I tried to create the affect that you was looking at a skyscraper with the city in the background, in the depth of field. Also the background like the last photograph, the blue sky allows the viewer to focus in on the subject. I changed the view point on this photograph to capture the depth of field, and took it from low down like you where looking at the sky scraper from the street.


Photograph 9: “The Leading Lines”


9branches


Rules Of Composition Used:

– Experimentation

– Leading Lines?

– Background

– View Point

– Depth Of Field

I was experimenting with this photograph, I had the idea that when taking this photograph that the blue sky background would make the twigs and branches look a little more prominent creating leading lines that take the viewers eyes all over the place, and makes you want to look deeper and find different aspects of the photograph. I took it from a low view point again like the previous photograph, to create the sky scraper look, I also think this photograph has an element of the depth of field. This photograph was taken purely on the basis to inspire photographers to experiment with the different elements of composition, to create a photograph that is unique.


Photograph 10: “On Top”


10ivymacro


Rules Of Composition Used:

– View Point

– Leading Lines

When I took this photograph I had the work of Heather Angel in mind, the photograph of the lady bug on top of the flower and its made to look as though its really high up. Using macro phtoography I took this picture, to create the affect that you’ve reached the peak of a plant and its a long way down, using a wide aperture I reduced the depth of field. Theirs a leading line on this photograph, that starts at the peak of the plant and makes the viewer follow it all the way down to the bottom as it gets more blured, I took this photograph from a high view point.


Photograph 11: “Another Perspective”


11window


Rules Of Composition Used:

– Depth Of Field

In this photograph I used a small Aperture to increase the depth of field so it blurs the subject closer to the lens, and allows for the increase of depth of field. This photograph gives the viewer a different perspective to the “On Top” photograph of the same subject, this time from the side.


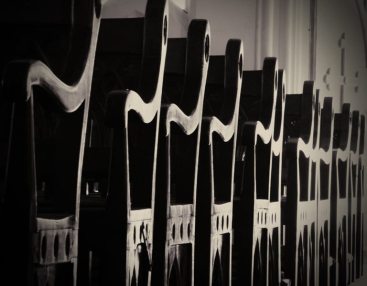
Photograph 12: “Symmetrical Top”


12gemetrictable


Rules Of Compostion Used:

– Symmetry and Patterns

The sole purpose of this photograph was to showcase symmetry and patterns, I tried hard to find a natural subject like a leaf to showcase symmetry and patterns, but I settled with this table top instead, simply because it was a great example of symmetry and patterns, its like a mirror image you could split it down the middle and more or less it would be the same, apart from slight differences.


Photograph 13: “Bottle On The Wall”


13Messageinabottle


Rules Of Composition Used:

– Cropping

– Background

In this photograph I wanted to focus on the bottle, it was easy because of the dull background, it really makes the bottle the key focus point in the photograph. After taking the photograph I darkened the colours to give off the affect it was getting late. Another thing I notice about this photograph is that their is an element of depth of field and maybe framing?


Photograph 14: “Dark leafs”


14nightleaf


Rules Of Composition Used:

– Cropping

– View Point

In this photograph I wanted to give off the affect that after being out here all day, its getting late so I darkened the colours on photo shop. I wanted this photograph to be the night time version of photograph number 4. I focused in on the leaf using macro photograph, using a wide aperture to lower the depth of field, and again using a low view point.


Photograph 15: “Lets Go In”


15inside


Rules Of Composition Used:

– Symmetry

– Depth Of Field

– Background

– Cropping

In this photograph I mainly focused on symmetry, I took the photograph at a fast shutter speed. I wanted the main flame to be as straight as possible, with the two reflections of the flame either side so you could split them down the middle and it would be a complete reflection of each other. Also the black background, allows for the candle to be the main focus point. And their is depth of field because it goes right back to the buildings in the distance. This allows for a more interesting photograph.

Changing My Concept & My Inspiration


New Concept


I realised from my research that my concept, would not have worked this time of the year. With my original concept I wanted to photograph insects, and plants and then scale out and show that everything gets smaller the more you zoom out. The main reason I have chosen to change my concept is because, its December and their aren’t as many insects around, and one of the main things I wanted to capture in my photographs was the movement of flying insects and so forth, using shutter speed. So I decided to change my concept, and still use macro photography, and use the same base as my original concept for my photographs.

With my new Concept, I wanted to show that you can find the Rules Of Composition anywhere, and hopefully inspire the photographers who are viewing my photographs, and make them realise it doesn’t matter where you are, you can still create and come out with a beautiful photograph using the rules of composition.


INSPIRATION


Heather Angel & Stephen Studd


Heather Angel
Heather Angel is a photographer that photograph’s nature using macro photography. Her work is a big inspiration to my concept for my photographs. She uses macro photography, and is probably one of the greatest examples for my idea of scaling things out, and the size of everything is down to perspective. I will be using Macro Photography but there are no insects to photograph, so I will be using this to photograph drop lets of water, leaves and plants. Here are a few photographs that caught my attention.

This photograph by Heather, is one of the first Macro Photographs I came across during my research. I love the way she’s reduced the depth of field in this photograph, and made it look as though this lady bug is really high up, to the insect it will be very high. From looking at the photograph though, it makes you feel as though your looking through the eyes of an insect, I loved this affect, and is one of the biggest inspirations for my concept.

Newly discovered, which is probably the main source of inspiration for my new concept. Heather has captured “Symmetry and patterns” in this photograph, which made me realise you really can find the rules of composition any where, even in nature.

Another photograph of Heather’s I came across, was this photograph of a leaf floating on top of some water. She really has used this opportunity to her advantage, using the water she has created a “frame” and “background” for the leaf, making the leaf the key focus point of the photograph. Something I will be considering when taking my photographs.


Stephen Studd
One of the effects I want to create in my photograph is to make a plant look like a sky scraper using the rule of composition “view-point”, and Stephen Studd’s work is what inspired this idea. I love the way his photographs transform the small world beneath our feet into this massive man-sized world, and how he makes a small bunch of flowers look the same size as New York City its something that really caught my interest.

I wasnt sure If I would be able to showcase Stephens Work on my blog, due to copyright issues. So I have left a link below this paragraph so you can see exactly what I mean, when I say he makes plants look like sky scrapers using different view points. In his “Plants” portfolio, and his “Garden” portfolio.

http://www.stephenstuddphotography.com/

Macro Photography

I decided not to look into tilt-shift photography down to me not being able to access a tilt-shift lens. I could have done this tequnique in photoshop, but its just not as authentic as actually using the lenses.

Using Macro photography, you can create some really interesting affects. Macro photography can make the smallest of objects, plants, insects look enormous. Macro will allow me to acheave the kind of affect and message I want people to take from my photographs. I researched into how to use Macro to my advantage, how to get the most out of this type of photography, I also researched into other photographers and I will explain exactly how they have inspired the concept of my project.

Macro photographs are my main source of inspiration for my concept. Just looking at macro photographs of insects really got me thinking, to us an insect is this little tinny inferior creature, but using Macro photography it really focuses in on the detail and gives you a close up view of the insect, making them look enormous among their tinny world. This made me think about the fact that the size of everything is down to perspective. For example: Looking down at a busy city from a skyscraper, makes the human race look like ants. The view of the moon from the earth makes it look like a tinny object floating in the sky.


Macro Photography


Here I will explain exactly how a macro photograph is achieved, and how to get the most out of macro photography.

Magnification

The size of the subject that is picked up by the image sensor in a photograph is described by Magnification, in comparison to its actual size in real life. The closer you move your lens to the subject, the larger the subject will Apear on the image sensor, this means the subject magnifies on the camera. Say the object is 25% as large as the actual object, then the subject is (1.4 or 0.25px) on the camera. So even the smallest subjects can be magnified, and come out larger than they actually are and fit the frame on the camera’s screen.

macro_magnification025d
If taking a macro photograph on an SLR their are numerous options of lenses, but when taking a macro photograph on a digital camera, when setting the camera to (macro mode) will allow closer focusing distances.


Control Of Photograph

When using magnification on a camera, you not only magnify the subject, you also magnify camera movement, such as camera shake. So when taking a macro photograph its best to use some form of tripod or stand to keep the camera steady whilst taking the photographs. Here are some of the tripod requirements when taking Macro photographs…

low tripod
Tripod Legs – helps if the tripod legs are able to be adjusted almost horizontally to get right down and take your photos. Most of the  time when taking these photos on some tripods you will need to remove the central column on  the tripod.

Tripod Head – When taking a macro photograph, one of the main things a tripod needs to do is, allow you to navigate the camera smoothly whilst taking your macro photographs. Ball headed tripods are usually the best for taking macro photographs, they allow you to navigate the camera in a few different directions, smoothly.

If you haven’t got access to a tripod, positioning the camera on the lens cap usually works when taking macro photographs from a very low position. Also another good bit of equipment to use when taking a photograph at a high magnification is a (remote/shutter release device), this prevents the person who is taking the photograph from moving the camera when pressing the shutter button.


Macro Focusing & Depth Of Field

Positioning your focus point when it comes to taking macro photograph’s can be very time consuming, it is always best to pre-plan your subject before photographing them. When taking Macro photographs at a very high magnification creates a shallow depth of field. There for controlling the focus point of your photograph is much more important than normal. This creates technical decisions about what should be the sharpest focus in your photograph, but also creative decisions about what subject should be in sharpest focus in your photograph.

Taking a photograph is a very delicate operation, their are a few things that can affect the positioning of the sharp focus point when taking a macro photograph. If your camera autofocuses it creates major problems, when it comes to positioning the sharpness of the focus point on your subject. Its use full to use a focus rail when positioning your focus point. Using a focus rail, the focus point of your photograph depends on the positioning of the camera, instead of using the less precise focus ring on the camera.

Experimentation With Shutter Speed & ISO

SHUTTER SPEED

I went out onto the street and took photographs of moving traffic, experimenting with the different shutter speeds. All of the vehicles I photographed where moving at roughly the same speed. Above the images are the speeds of the shutter in which I took the photographs, and the setting of the ISO.


1/4 Shutter Speed – ISO Sensitivity (100)


_MG_0821

_MG_0823

As you can see the vehicle’s in these photograph’s are blurred. This is because the shutter was open for 1/4 fraction of a second, this permitted more light into the image sensor. This makes the vehicle look as though its moving a lot faster than it actually is. because the shutter was open for a lot longer.

Also notice the background is still in both photographs are still, this is because I set the sensitivity of the ISO to 100, . The only Blurred image in the photograph is the vehicle because it’s the only subject moving in the photograph.


– Failed Panning Shot –
1/60 Shutter Speed


_MG_0820

In comparison to the photo’s I took in 1/4 (of a second), you can see this vehicle is a lot less blurred, because less light is permitted through, because the shutter speed I used was a bit faster, this was taken at 1/6. And the blurring of the background, is also because I moved the camera whilst taking the shot, attempting to focus upon the moving vehicle.


1/100 Shutter Speed – ISO Sensitivity (200)


 _MG_0829

_MG_0828

1/100 shutter speed, is a lot faster so it captures that light at that moment the photo was taken, unlike 1/4 shutter speed that permits light over a longer period to the image sensor before the shutter closes and the photo is taken. The 1/100 shutter speed, creates the effect that the vehicle is stood still, but it was actually moving at the same speed as the other cars.

And using ISO sensitivity of (200) as you can see in this photograph, the background is still, creating the effect in the photograph that their is no movement what so ever. Making the photograph completely still.


– Panning Shot –
1/30 Shutter Speed


_MG_0831

In this photo I used a 1/30 shutter speed. The effect I tried to capture in this photograph was to blur the background and focus in on the vehicle, not the best example of a panning shot but a lot better than the last photograph. creating the effect of a reduces of depth of field and blurs the background, and allows you to focus in on the subject.

Photography Project Concept


Brief


For my photography project I have been asked to explore a subject of my choice, and comprise a portfolio of photographs ranging from 15-30 images. These photographs must be either informative, entertaining, or educational.


Concept


I have decided to base my project on the size of things down to perspective, I will be using my back garden as the base for my photographs.

I like the idea of making my garden appear as though it is like rainforest, and making the plants and insects look larger than they actually are, by experimenting with the angle and view points my photographs have been taken from. After I have taken my macro photographs, I want to slowly zoom out and have a person looking around at the plants and insects, so the perspective changes, followed after these shots I want to use different view-point and take a photograph from high up, of the person. This will allow each of my photographs to work as a whole. By doing this I want to give off the message that the size of everything is down to perspective, and everything keeps getting bigger and then smaller. I hope to achieve this by using macro photography & tilt-shift photography.


Inspiration


I will be researching into these different photography techniques, to see how they can be achieved for my project.

Macro Photography
Macro photography is probably the biggest inspiration for the concept for my photography. I like the way macro photography makes smaller objects and life look a lot bigger then they actually are.

macro
Tilt Shift Photography
Tilt shift photography is really interesting, when using a tilt-shift lens from a high view-point, when taking a photography it creates a shallow depth of field which makes life scale subjects, look like small models. I am excited about learning more about how to create this effect.

tilt-shift-construction
Both of these different photography techniques will create the exact effects I want on my subjects in my photographs. Using macro photography I will be able to make the smaller subjects look larger. And by using different view points playing with the perspective and tilt-shift photography, I will be able to make the larger subjects look a lot smaller.

Aperture & Shutter Speed


APERTURE
A space through which light passes in an optical or photographic instrument,
especially the variable in which light enters a camera.

SHUTTER SPEED
Is the length of time a camera’s shutter is open for, when taking a photograph,
the amount of light that reaches the cameras is proportional to the exposure time.


Photography is all about light, light controls what you see in a photograph, because natural light changes constantly we need to be able to control this, and use this to our advantage.

Aperture
In photography the aperture is the opening behind the camera’s lens that permittes varied light through, depending on the adjustments made by the photographer. The aperture uses these things called aperture blades also known as f-stops to limit the light passing through. The light permitted by these blades is measured within the focal ratio, more commonly known to photographers as f-numbers.

Focal Ratio
This is the measurement between the size of the lens of a camera in relation to the diameter of the opening between the apertures f-stops. These measurements are used for the adjustments of the aperture, allowing a photographer to identify how wide the aperture is to how small the aperture is. Most modern cameras use a one-third f-stop type aperture range, bellow is the f-numbers that most modern cameras range from…

f/1.0, f/1.1, f/1.2, f/1.4, f/1.6, f/1.8, (f/2.0 Large Aperture) f/202, f/2.5, f/2.8, f/3.2, f/3.5, f/4.0, f/4.5, f/5.0, f/5.6, f/6.3, f/7.1, (f/8.0 Medium Aperture), f/9.0, f/10.0, f/11.0, f/13.0, f/14.0, f/16.0, f/18.0, f/20.0, (f/22.0 Small Aperture)

As the numbers go up the smaller the diameter of the aperture gets, the smaller the amount of light is permitted through. And as the numbers go down the larger the diameter of the aperture gets, allowing a larger amount of light through. Here is a diagram that shows exactly what I am talking about.

aperture2(f/2.0) Wide apertures reduce the depth of field and blur the background, this allows the photographer to focus on the subject you are taking the photograph of. A wide aperture would need a faster shutter speed to freeze the action.

wideaperture

(f/22.0) Small apertures increase the depth of field and allow for great land scape shots, smaller apertures allow for a slower shutter speed, this allows for creative motion blurs and really nice light trails on a night-time.
small


Image Sensor & ISO

The image sensor is a tool located to the back of the camera, this sensor captures the optical images using the light permitted through from the aperture and then converts them into digital images. Image sensors are sensitive to light, the sensitivity of an image sensor is measured by ISO.

ISO is measured in numbers that double depending on the sensitivity of the image sensor, the lower the number the lower the sensitivity, the higher the higher the sensitivity, this can be adjusted on a camera. As the ISO measurement goes up the previous number doubles, but the same happens with the sensitivity. Most cameras has a set base ISO Nikon: 200 ISO, and some cannons: 100 ISO. Below is scale showing how the ISO goes up,

100 – 200 – 400 – 800 – 1600 – 3200 – 6400 ect…

Higher ISO settings are generally used for darker optical images, you are able to take a photograph without using the flash in the dark, the only problem is that there will be grain/noise in the digital image, so the lower the ISO the finer the grain in the image will be. It’s always best to just use the set base ISO when taking pictures. As the ISO goes up, so does the sensitivity, this means it takes less time to take an image.

iso

below is a scale I came across online that shows exactly that.
ISO Speed Example:
ISO 100 – 1 second
ISO 200 – 1/2 of a second
ISO 400 – 1/4 of a second
ISO 800 – 1/8 of a second
ISO 1600 – 1/16 of a second
ISO 3200 – 1/32 of a second

Say your camera needed 1 second to capture a photograph at ISO 100, by switching the ISO up to 800 you could take that image in 125 milliseconds.


Shutter Speed
Is the speed in which the shutter of a camera opens and closes, it is the control of light permitted to the image sensor at that moment. The speed can be adjusted, the slower the shutter speed the more light is permitted through at that time creating a more blurred image, down to prolonged light exposure to the image sensor. A faster shutter speed creates a sharper still image, because it’s a lot faster it captures a limited amount of light at that time, the photograph was quickly snapped. As you can see from the photograph below, the photo on the left is a slower shutter speed and the photo on the right is a faster shutter speed.
shutterShutter speed is measured within fractions of a second, so fast shutter speed would be 1/500th of a second, and a slower shutter speed would be 1/60th of a second.


References:
http://digital-photography-school.com/iso-settings/
http://www.steves-digicams.com/knowledge-center/how-tos/digital-camera-operation/how-is-shutter-speed-measured.html
http://www.digitalcameraworld.com/2012/05/16/apertures-photography-cheat-sheet-when-to-go-small-and-when-to-go-wide/
http://en.wikipedia.org/wiki/Aperture
https://photographylife.com/what-is-aperture-in-photography

Rules Of Composition

In this post I will be talking about the different rules of composition, that allow a photographer to create a beautiful photograph. Some are more widely used than others, but all are very good for their own reasons.


Rule Of Thirds
This is one of the more well-known compositional techniques that makes photos more interesting and dynmaique. The rule of thirds is based upon a theory that a picture is more interesting when broken up into regions. The rule of thirds works by using 4 imaginary lines that break a photo up into 9 pieces, 2 lines going vertical and 2 lines going horizontal. Rule Of Thirds works by aligning the focus point of the image, with one of the vertical lines, and capturing the background in the rest of the regions. This allows for a more straight forward, even photograph. Take for example this image below…Understanding-the-Rule-of-Thirds-Why-it-works-2


Leading Lines

In a photograph if there is some form of line like: a road, train track, path. naturally when a human looks at a photograph, their eyes are drawn to a leading line, that they follow down the image before looking at anything else. This is a really great tool for photography, because it allows a photographer to pull the attention of some one looking at the photograph down a leading line towards a focus point on the actually image. It’s as though you are taking the viewer on a journey down the leading line, to the subject of the photograph. Take for example this image below, not only is the road itself a leading line but the road markings as well, they lead you up the road to the focus point of the image the rising moon.
leading-line-2avahik


Depth

This composition rule is where in a photograph there is depth. As well as the focus point of the photograph there is a central point to the photo, and a background. Including all of these elements in a photograph, creates depth give the person looking at the photograph more to look at, take for example this image below, in this photo you have the sheep which are the key focus point of the image, then you have some hills central to the image, and then in the far background you have larger hills in the distance.

depth


Background

When taking a photograph some times the focus point of the photograph blends into the busy background, this can destroy the impact of the key focus point of the image. A camera is very good at flattening the image of the foreground and the background. When taking a photograph of something to create impact from the subject, it is good to use a blank background this restores all impact onto the subject you are taking a photograph of, take for example this photo below.
background


Balancing Elements

When taking a photograph, making the focus point of the image off-set from the centre creates a more interesting photograph, leaving empty space in the rest of the photo can sometimes make the photograph look off balance. It’s good to include other elements in the photograph that are of less importance in the background, this just makes the photograph seem fuller and gives the photograph more balance. Take for example the photograph below.
out-road-sign


Framing

This is another great compositional technique that allows the person viewing the photo to instantly focus on the main subject of the photograph, just like leading lines makes a person follow the lines to the key focus point of the photograph. Framing is where when taking a photograph you use your surroundings where the subject of your photo may be, using the surroundings to frame the subject, making the subject of the photo stand out from the rest of the photograph. Take for example this photograph below. The use of the cave surrounding the castle, gives the focus point of the image the castle more impact.
framing1


Symmetry And Patterns

This can be found every where, we are surrounded my symmetry and patters both natural and some man-made. Symmetry and patterns create a very eye-catching and beautiful composition. Symmetry is where the other half of something is like a mirror image this creates impact in a photograph and catches the attention, where as patterns create visual rhythm in a photograph. Take for example this photograph below.
symmetry


Cropping
This compositional technique is where in a photograph the background creates too much noise upon the focus point of the photograph, making it blend in and giving it a very dull affect killing the impact of the subject, cropping allows a photographer to focus in on the subject of the photo, and eliminating the background of the photograph making the subject the main focus point for the viewer of the photo. Take for example this photograph below.
cropping


View Point

Most photographs are taken from eye level, changing the angle of a photograph like taking the same photo but from above or below, changes the message of the photograph. And creates a greater impact of the photograph, this is a really good compositional technique because it transforms the photograph into something completely different. Take for example this photograph below.
Viewpoints-Shooting-low


The Golden Triangle Rule

Like the rule of thirds, the golden triangle consists of imaginary lines one going from the bottom left hand corner of a photograph to the top right hand corner, then two other lines that connect to the central line, one from top left hand corner the other from the bottom right hand corner creating two large triangle shapes and two smaller triangle shapes, it looks like this.
thegoldentriangle-rule
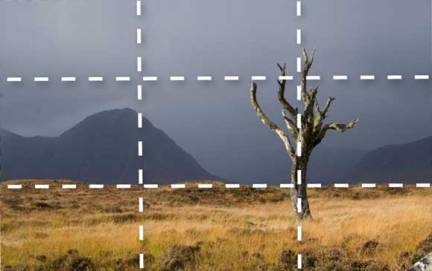
All you have to do when using the golden triangle is make sure you fill one triangle with a subject in your photo, and then allowing the central line to align up with another form of subject in your photograph, this creates a very neat and tidy photograph . Below is an image of the golden triangle being used.
6146771787_4504ecf660_z